Finding the Best Fit for Your Ballet Soft Shoes

5281539131_7b6bd70ed3_z(1)

Fitting the right ballet shoe is somewhat like finding a brassière or the right shade of makeup: it’s almost impossible to buy the right one unless you’ve tried plenty of them on. Even if you have a pair of shoes that you’ve worn before and that seem to work well, it’s always a good idea to try on multiple pairs before deciding on one. There are always new and enhanced styles that might suit you better than your last pair, and you might just find a new favorite.

If you’ve never been professionally fitted before, trying to find your own pair can be overwhelming. Dancewear sizes are typically different from street clothing or shoe sizes and the numbers vary between companies and styles. Because all of this can make you crazy with confusion, here are some tips for making sense of the process:

1. If you’re enrolled in a formal class, check with your instructor before you buy anything. They or the studio might have rules or preferences about footwear and you’ll want to know what they find acceptable. They might even be able to recommend a specific brand or style that they think will fit your individual needs.

2. Consider the many, many style options. Soft shoes vary in more than just size – most companies make shoes in several colors, materials and sole types, and many of them incorporate fancy features like elastic or mesh arches. Here are the basic factors you should use to get started:

Material

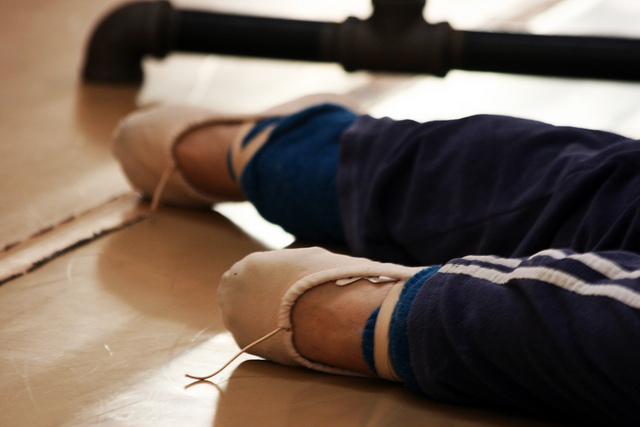
Typically, soft shoes come in either leather or canvas. Both are perfectly suitable for regular practice, but they each offer different benefits.

Leather shoes provide a good grip on wood floors, but they might be too sticky for a vinyl Marley-style floor. This material will stretch and shape to your foot as you dance in them, so keep this in mind when you’re sizing them. Leather shoes also tend to last longer than canvas.

Canvas shoes are usually better suited for vinyl floors as they may slip too easily on wood. There isn’t much give in the fabric, so make sure the fit is perfect before you buy them. Canvas shoes are often shaped with more pleats than leather, which generally makes them able to accommodate wider feet. One great thing about this material is that there’s practically no break-in period, so how they feel when you first buy them is how they’ll feel until they wear out. Canvas can also be easily cleaned in the washer and set out to air dry – just be sure to avoid the dryer.

Color

The most common soft shoe colors are black and pink. There are also endless shades of pinks ranging from tan to bubblegum pink; the particular pink you choose typically depends on your preference, but you may want to check with your instructor to see if they have a particular preference (although generally, adult studios tend to be more relaxed about it).

Sole

Two basic sole types are full-sole and split-sole. For young beginners, teachers usually recommend a full-sole shoe because it offers more resistance and helps build arch strength early on. However, split-sole shoes are most commonly used by teens and adults as they tend to look nicer on the foot.

3. The sizing chart is a good guide for trying on your first pair, but don’t trust it blindly. Try to avoid buying shoes online unless you are very familiar with the company’s sizing or don’t mind returning a few pairs. Like any other shoe, ballet shoe sizes vary from company to company and many of them are measured in inches or European sizing charts. So if you’ve never been fitted before, it’s best to go to a dance supply store and try on the shoes in person. Most brands run 1-3 sizes smaller than street shoes, so use the company’s sizing chart to tell you where to start.

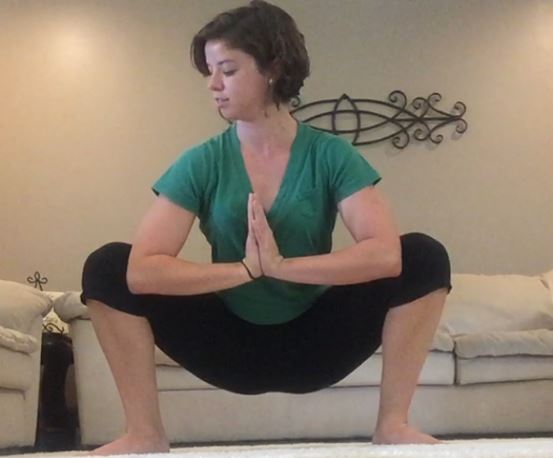
4. Once you’ve found your size, stand in them and try out a few pliés and relevés. Your toes should have enough room to spread out flat on the floor. If your toes feel crunched now, imagine how they’ll feel after a two-hour class! Point and flex your foot to make sure the heel doesn’t slip off or cut into your skin. A great measure for shoe length is to pinch the fabric at the back of the heel where the seam is. The ideal fit will allow you to pinch a thumb-width section together when your foot is pointed, yet have no gathered fabric when your foot is flexed.

5. Pull the drawstring just tight enough so that there are no gaps at your arches. You’ll probably want to tie a bow instead of a knot in case you need to adjust later. Remember to tuck the ends inside the shoe when you wear them for class.

Image via Flickr User Quinn Dombrowski

The Power of Pilates — Using Pilates to Strengthen Your Core for Ballet

16176097088_380a05dace_b

Cross training can sound intimidating: what about time commitment, additional expenses, or  lack of energy? However, don’t let these factors prevent you from adding a new exercises to your daily routine.

During my dance career, I experienced a plateau period when I didn’t notice advancements in my dancing. This was a frustrating time, and I struggled to find a reason why I wasn’t improving and gaining strength. I noticed my most prevalent weak area was my core, so I searched for exercises that would be most beneficial. Over time, I realized that I needed to incorporate some type of cross-training in addition to my usual ballet classes. I found my niche in Pilates, the ultimate core building series of exercises invented by Joseph Pilates. I realized that I needed a strong core, or powerhouse, to get to the next level.

Pilates is a fantastic cross training option that will improve your dancing and overall well-being. Focusing primarily on core strength, Pilates provides the perfect accompaniment to ballet’s core centered exercises. The moderately paced mat classes offer a low impact yet effective workout that will sculpt the body into a long, lean silhouette.

After completing the beginner phase of training, the workout starts with a challenging abdominal series, requiring immediate movement. Not to be mistaken for the series of prolonged yoga poses, Pilates requires swift execution of with rare, brief rest periods between exercises. The movement continues at a steady pace, including targeted leg, arm, and back work. The assortment of exercises prevents loss of interest and provides a full body workout.

Ultimately, the goal of Pilates as a cross training exercise is to enhance the lean muscle mass achieved in dancing. Also, Pilates leads to increased core strength and flexibility, as well as improved posture. For those who are searching for additional ways to improve their dancing, Pilates is a fantastic option for reaching the next level.

Image via Flickr User Migration Museum Project

5 Easy Remedies for Your Post-Class Soreness

For a ballerina, there’s no bigger pill to swallow than starting a warmup with all-over muscle soreness. You worked your buns off the day before, and today, you’re feeling the consequence. Your legs each weigh a ton, your arms are like cooked noodles and your abs are so sore that even a chuckle sends you into the fetal position.

How are you supposed to dance when your body feels like this?

Despite what you might think, muscle soreness can be a  good thing. It can be frustrating and dreadful at times, but it’s a sign that your body has been challenged and is doing the repairs it needs in order to build muscle tissue.

Of course, by stretching and working responsibly, you can prevent unnecessary damage to this tissue — but if you’re pushing for significant improvement, it’s almost impossible to totally avoid soreness altogether. Because we all experience it at some point, here’s a list of our favorite remedies for those pesky aches:

1. Water

We all know that our bodies are largely composed of water and that it’s crucial to stay hydrated especially when we’re active. Get as much of it as you can during your rest periods and you’ll decrease the amount of soreness you experience after your workouts. By drinking lots of water, you’re flushing out the buildup of lactic acid in your muscles, which is what causes soreness. Try an electrolyte-infused water to replace what your body loses in sweat, and you’ll keep your muscles lubricated for your next session.

Beyond drinking it, the next best thing for sore muscles is soaking in it. Epsom salt baths are extremely beneficial as they provide the crucial minerals magnesium and sulfate, which help to form proteins and to flush toxins such as lactic acid from the body. Try adding about two cups of Epsom salt to a warm bath (it will dissolve more quickly under running water) and soak for at least 12 minutes. Your muscles will instantly feel more relaxed when you’re weightless in the warm water.

2. Massage

It might seem counter-intuitive to squeeze and rub your muscles when they’re already throbbing, but it’s the best way to push out that lactic acid that makes you weep in pain. Aside from the tried-and-true method of manual massage, here are some really helpful tools that can do the work for you.

IMG_8488

  • Foam roller

This one’s especially great for pressing out that IT Band, the “turnout” muscle. It gets knotted up easily, and ballerinas can benefit from massaging it regularly.

  • “The Stick”

For lack of a better name, The Stick is an awesome alternative to the foam roller. It’s thinner and made of a firmer material, so it reaches smaller areas with more pressure. Also, it’s handheld, so you can do it just about anywhere you can sit down.

  • Tennis ball

If you have one of these babies laying around, try using it to get localized pressure on those tiny areas your hands can’t find. Though most people use them to massage sore arches, there are tons of ways to use them. Experiment with lying on floor with the ball underneath your back — the spaces between your shoulder blades and spine carry a lot of tension, and the tennis ball works wonders here. Depending on the kind of pressure you like, a bouncy ball or golf ball will also work.

3. Stretching

Sometimes it feels great to sit in a straddle when your inner thighs are sore and you might think that stretching is exactly what you need. This is partially true, but in general, try to stay away from static stretching when you’re sore. For the most part, muscle soreness is caused by tiny tears in your muscle fibers. By sitting in a stretch for a long period of time, you’re probably only adding to the torn tissue, and your soreness will probably only get worse. Instead, try some dynamic stretches to warm your body and bring blood flow to your muscles. A great place to start is with sun salutation or some grand pliés.

4. Nutrition

What you eat is a extremely important to how you heal. Make sure you’re getting a balanced mix of lean proteins and complex carbohydrates. Eating foods such as bananas or spinach which are high in potassium will help soothe muscle cramps and anything with vitamin E will help reduce inflammation. Nuts, for example, are a great after-class snack because they have tons of protein and vitamin E.

5. Rest

What your mother always told you is actually true. Beyond all else, rest is what your body needs most in order to recuperate, whether it’s from illness, injury, or just exhaustion. When your muscles are telling you to stop pushing them, listen. Sometimes trying to push through the pain will only create more pain, and it’s important to know when to just stop and rest. Allow yourself plenty of rest and sleep, and if after two full days of rest you still feel too sore to move, ask your doctor about how to treat the pain. If your soreness is actually a more serious injury, you should find out as soon as possible so that it can heal properly.

The Dancewear Project’s Awesome Striped Ombre Legwarmers

Ever since I ended up with stress fractures in both of my legs (and given that I have pretty bad ankles, too) — I’ve been addicted to wearing legwarmers when in the studio. Even if it’s a humid 95 degrees out in Philadelphia. I’m always on the hunt for pretty legwarmers (it’s so easy to get sick of your standard black) and jumped at the chance to try the The Dancewear Project’s Striped Ombre Legwarmers:

i-qGJXKhx-L_grandeA photo from The Dancewear Project’s website

I first came across The Dancewear Project because they launched a leotard line with Ballet Zaida (which if you’re not following on Instagram you should be). So I reached out to Melissa at The Dancewear Project and she kindly offered to let me try a pair for free! And I fell in love with them.

Since I have fairly big thighs, sometimes finding legwarmers that can go up to them and not restrict them can be tough — that’s why I was so happy to pull out Dancewear Project’s legwarmers and find out that they were super stretchy and super cute (I seriously love all things striped — and that’s the only downside to these legwarmers to me — is making sure I’m not clashing with a striped top when I pack my dance bag!)

The legwarmers are warm, but breathable, and look cute, too. I love them for my classes that I take in slippers — they can be pulled down over your ankles to keep them warm at barre but then quickly pushed up for across the floor work. I think I’ve only worn them once for pointe class, but I liked them for that class as well since they could be both pulled down over my ankles and rolled up quickly. They wash nicely, too, and will definitely remain something I keep wearing year-round, and I’ll probably pick up a second pair, too (the pink ones are adorable, too). Here’s some of my photos from after class (I’ll add some more once I get the chance to take pointe shoe photos, too):

FullSizeRender(2)

IMG_3588

I can’t wait to try out the rest of The Dancewear Project’s line, too! If you’d like to, you can use the code adultballerina at checkout for 20 percent off!

3 Essential Stretches to Improve Your Turnout

Whether you’re trying to improve your flexibility, warm up for class, or just relieve some muscle soreness, stretching can be extremely beneficial. For this tutorial, we’ve picked our favorite basic hip-opening stretches inspired by our favorite yoga poses and in-class exercises.

Each of these poses can be modified to be either more or less intense, so choose the best variation for you. As always, listen to your body and keep in mind these tips for safe stretching:

  • Repeat the stretch on both sides. Don’t give up on one side when it can’t quite do what the other can. Symmetry makes for good alignment!
  • Breathe. It seems obvious, but it’s a natural tendency to hold your breath during a deep stretch. Taking deep breaths sends oxygen through your blood and to your muscles, which both feels great and helps your stretch.
  • Move slowly in and out of stretches, and never force yourself past the point of pain. Protect your instrument!

Drop-Second Plié

Stand in a wide second position, turning out only as much as your hips will allow. Hold onto a barre, table, chair, etc. for support as you bend into a deep grand plié. This stretch will be wider and lower than a proper grand plié, and you’ll want the weight of your pelvis to drop between your heels. Be careful of over-rotation — always keep the arches lifted, with all five toes rooted into the floor.

If you feel stable enough to balance in this position, try lifting your hands off the barre and placing them at your chest, palms together. Place your elbows at the insides of your knees and push your hands downward to push the knees back and open. Remember to breathe! To recover, gently take your elbows away from your knees, place your hands back on the barre, and use your glutes to rise and straighten your knees.

DROP 2nd

Continue Reading