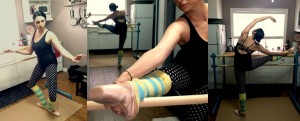
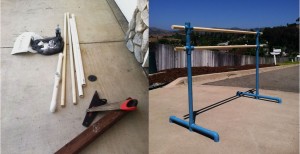
I’m really excited for this post today because the project in it has changed my life. (A little dramatic, maybe, but you get the idea!) It has been so nice to be able to have a barre at home to practice my port de bras, tendus, pliés, etc. when I don’t really have time to go to a full class. I had been using my door frames and kitchen counter to balance previously and let me tell you- not so graceful looking! I had seen some Instagram posts of people using portable barres so I looked online to see where to buy one and was not super excited about price. I got to scouting for other solutions and found this lovely tutorial by Laughing Abi and I thought I’d give it a shot. As to not be horribly boring and repetitive, I’ll leave the step by step out and summarize the process and also include the little changes I made to my barre from the tutorial.
Here’s what you’ll need to replicate my barre:
- Six 1 1/4 inch PVC cross joints
- Four 1 1/4 inch PVC elbow joints
- Two 30 inch long 1 1/4 inch PVC pipes (I made my barre at 43 inches because I’m tall. In order to change the height of the top barre, adjust the lengths of PVC that are 30 inches.)
- Two 6 inch long 1 1/4 inch PVC pipes
- Four 12 inch long 1 1/4 inch PVC pipes
- Two closet rods or wooden dowels between 1 1/8 inches and 1 1/4 inches in diameter… these should be around 6 feet long in the store.
- 8 screws
- Spray paint (I used Valspar Perfect Finish Gloss in “Tropical Oasis”)
- PVC glue (I used Christy’s Red Hot Blue Glue)
What you’ll want to do is assemble the 2 of the 12 inch pieces together with a cross in the center and an elbow on each end. Repeat for the other side. I glued all of those joints together for extra sturdiness. It’s optional but if you choose to do it, make sure you work fast because that glue dries in a heartbeat! From there stick the long pieces (mine were 30 inches) into the cross you just attached the 12 inch pieces to. You’ll then add a cross to the end of that. Repeat for the other side. Now you can slide in your first barre! Now insert the 6 inch pieces into the top cross joints. Add the final cross joints to the tops of those and now slide in your first barre. This is where I took mine apart again to paint it. After the paint was dry I put the barres back in where I wanted them and instead of using foam as suggested on the tutorial, I screwed through the cross joints into the wooden barre. This was my dad’s suggestion to help the whole thing from wobbling side to side. I did a screw on each side of the cross joints (8 total). I then carefully sprayed those teal as well. That’s more or less it! It was simple, sorta fun, and fast. I think I managed to finish the entire project in under two hours which isn’t bad for something I get so much use out of.
Overall, I’m pretty pleased. It made practicing at home a lot easier. It also has come in handy for stretching! I must say, because of how lightweight it is it isn’t super sturdy. This means that you can’t really put much weight on it, it’s really only good for adding some balance to what you are doing. In the end, that’s really what a barre is for anyway so it is helpful not only to help you keep balanced but also to remind you not to use the barre to hold you up. Make that supporting leg do some work! 🙂 I also added a big piece of cardboard left over from when we had some bark delivered for our landscaping in order to keep my shoes from getting scuffed on the flooring. It also comes in handy for practicing in the bedroom, where we have carpet. The combo has become my own little studio that all tucks behind my dresser when I’m not using it which is perfect for how small our place is.

Using my barre for pliés and stretching in my kitchen which is right across from a full length mirror.
So there you have it! An easy, affordable, and portable ballet barre that you can make yourself. I honestly am glad that I made it. If you decide to give it a whirl, let me know how it works out! Do you have any other suggestions for ballet at home?
-Caysie


