DIY Barre–ballerinas can build too!

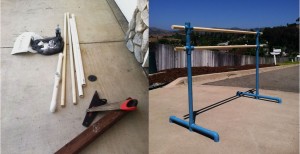
Before: giant pile of pipes and wood. After: beautiful ballet barre that matches my decor. Yippee!


I’m really excited for this post today because the project in it has changed my life. (A little dramatic, maybe, but you get the idea!) It has been so nice to be able to have a barre at home to practice my port de bras, tendus, pliés, etc. when I don’t really have time to go to a full class. I had been using my door frames and kitchen counter to balance previously and let me tell you- not so graceful looking! I had seen some Instagram posts of people using portable barres so I looked online to see where to buy one and was not super excited about price. I got to scouting for other solutions and found this lovely tutorial by Laughing Abi and I thought I’d give it a shot. As to not be horribly boring and repetitive, I’ll leave the step by step out and summarize the process and also include the little changes I made to my barre from the tutorial.

Here’s what you’ll need to replicate my barre:

  • Six 1 1/4 inch PVC cross joints
  • Four 1 1/4 inch PVC elbow joints
  •  Two  30 inch long 1 1/4 inch PVC  pipes (I made my barre at 43 inches because I’m tall. In order to change the height of the top barre, adjust the lengths of PVC that are 30 inches.)
  • Two 6 inch long 1 1/4 inch PVC pipes
  • Four 12 inch long 1 1/4 inch PVC pipes
  • Two closet rods or wooden dowels between 1 1/8 inches and 1 1/4 inches in diameter… these should be around 6 feet long in the store.
  • 8 screws
  • Spray paint (I used Valspar Perfect Finish Gloss in “Tropical Oasis”)
  • PVC glue (I used Christy’s Red Hot Blue Glue)

What you’ll want to do is assemble the 2 of the 12 inch pieces together with a cross in the center and an elbow on each end. Repeat for the other side. I glued all of those joints together for extra sturdiness. It’s optional but if you choose to do it, make sure you work fast because that glue dries in a heartbeat! From there stick the long pieces (mine were 30 inches) into the cross you just attached the 12 inch pieces to. You’ll then add a cross to the end of that. Repeat for the other side. Now you can slide in your first barre! Now insert the 6 inch pieces into the top cross joints. Add the final cross joints to the tops of those and now slide in your first barre. This is where I took mine apart again to paint it. After the paint was dry I put the barres back in where I wanted them and instead of using foam as suggested on the tutorial, I screwed through the cross joints into the wooden barre. This was my dad’s suggestion to help the whole thing from wobbling side to side. I did a screw on each side of the cross joints (8 total). I then carefully sprayed those teal as well. That’s more or less it! It was simple, sorta fun, and fast. I think I managed to finish the entire project in under two hours which isn’t bad for something I get so much use out of.

In progress.


Overall, I’m pretty pleased. It made practicing at home a lot easier. It also has come in handy for stretching! I must say, because of how lightweight it is it isn’t super sturdy. This means that you can’t really put much weight on it, it’s really only good for adding some balance to what you are doing. In the end, that’s really what a barre is for anyway so it is helpful not only to help you keep balanced but also to remind you not to use the barre to hold you up. Make that supporting leg do some work! 🙂 I also added a big piece of cardboard left over from when we had some bark delivered for our landscaping in order to keep my shoes from getting scuffed on the flooring. It also comes in handy for practicing in the bedroom, where we have carpet. The combo has become my own little studio that all tucks behind my dresser when I’m not using it which is perfect for how small our place is.
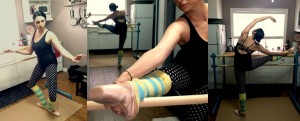
Using my barre for pliés and stretching in my kitchen which is right across from a full length mirror.

So there you have it! An easy, affordable, and portable ballet barre that you can make yourself. I honestly am glad that I made it. If you decide to give it a whirl, let me know how it works out! Do you have any other suggestions for ballet at home?

-Caysie
How Running Taught Me The Importance of Stretching

longi0.jpg

Yeah…I can’t do this. (Photo credit: Wikipedia)


Ballet requires stretching. You need to be flexible. But as a busy college student, the want to be flexible and get my splits just wasn’t motivation enough. If I had actually started stretching regularly when I started I’d probably be there by now–but I haven’t. I developed challenges and plans and even tried yoga–but it didn’t work. I would only occasionally stretch.


Things have changed now that I’m running. In order get my calves into tip-top condition, I’m stretching them everyday and after every run. My foam roller is also seeing more use than ever. As my hips get tighter, I keep stretching them out more and more as well. Although my body is probably overall ending up tighter than before I was running, I feel like I’m getting somewhere as I incorporate stretching into my routine because for the first time in a while I feel like I HAVE to stretch or my body is just going to be ridiculously tight. So maybe running isn’t such a horrible thing for dancers after all.


How do you stay motivated to keep stretching?


Catching up on the Stretch, Plank and Squat Challenges!

King Pigeon Pose

My favorite yoga pose (Photo credit: lululemon athletica)

Good news is, while I’ve missed a few days of my squat and plank challenge–I’m completely caught up. While my boyfriend and I have a few days–we’ve caught up on the challenge’s days off. I’ve even managed to pull off a 1:30 plank, and I’ve been thinking about incorporating side planks and straight-arm planks.

Stretching has not been going quite as well. I was getting slightly sick of doing videos, so I basically ended up skipping stretching this weekend after a two-hour long ballet class and a super stressful Sunday (my 5k did not happen because of my shin splints). So I’ve been working on getting that back on track and Monday and Tuesday I just did some of the yoga poses and stretches I had worked on. Hopefully these will help me get closer to my splits in the end. Maybe I’ll get brave enough to put up some split photos when we reach the halfway point of our April challenge.

I’ve added another element of fitness to my daily routine to try to strengthen my calves for running and for pointe work (eventually–I’m taking baby steps in getting back to pointe work!). I’ve just been incorporating 3 sets of 12 calf raises and 3 sets of 12 single calf raises.

Now I just need to work more theraband stretching into my routine.

How have you been challenging yourself this April?

Beginner Ballet Tips: Two Week Stretch Challenge

twoweekstretchchallengeLast Friday I updated a page on the blog entitled the Two-Week Stretch Challenge. It has a 14 day plan to help encourage you to stretch everyday as well as vary the stretches you do each day. Each day has a different set of stretches from various fitness websites. Like the other stretch challenges I’ve (and some of my fellow adult ballerinas) have attempted, I recommend that you do some additional stretching so that you’ve stretched for a total of 30 minutes in a day (which can be broken down into 10 or 15 minute segments).

Although some of the stretches are specifically for running, I figured it wouldn’t hurt to try them since a lot of running stretches are good for tight legs and hips.

Like the page says, this is a  total work-in-progress, and I would love your advice on how the stretches went for you. If you have any stretches you’d like to see worked in, that’d be great too! I’m hoping to eventually build on this to make a complete, 30 day challenge. I’m working on testing each day (I’m on Day 3) and I’ll have an update once I’ve completed it on which stretch routines I liked best.

Here’s what the challenge is right now:

Day 1: How to do Splits  From About.com

Day 2: 15 Minute Beginner’s Yoga Routine

Day 3: Fat Burning Yoga

Day 4: Post-Run Stretches from Back On Pointe, A Dancer

Day 5: Yoga Poses for Headaches

Day 6: How to Do Splits From FitSugar

Day 7: Yoga Poses to Get Rid of Back Fat

Day 8: Essential Stretches for Tight Hips

Day 9: Stretches You Can Do in Bed

Day 10: Good Morning Yoga Sequence

Day 11: Pick your favorite set from Days 1-10

Day 12: Runner Stretches (Good for Tight Hamstrings)

Day 13: Stretches that Help You Sleep

Day 14: Stretches for Splits–Barre Stretches (Don’t have a barre or these look tough challenging? Pick your favorite individual stretches to create your own stretch routine today!)


A Different Take On Stretching

I’m not going  to lie, I failed at keeping up with the 30 day stretch challenge. Between my injury and not being able to attend classes (which killed my motivation)–stretching for a full 30 minutes didn’t happen everyday.

split rock pose : sutro baths, san francisco (...

split rock pose : sutro baths, san francisco (2012) (Photo credit: torbakhopper)

Yesterday, when I talked to my boyfriend after his Tae Kwon Do class, he mentioned how his instructor said that instead of stretching for just one period a day, you instead should stretch for shorter intervals multiple times a day. This allows your body to get used to being stretched several times and not just being exposed to it once a day. This gymnastics article also says that “short, repeated exposure to stretching is more productive than a single intense or long bout of stretching.”

It’s better to stretch for 10 minutes a day than 70 minutes once a week–which is what I would end up doing because I’d avoid stretching and then try to make up for it

So for the next 30 days, my plan will be to try to stretch for still 30 minutes total a day, but in three segments: 10 minutes when I wake up, 10 minutes during my lunch break, and 10 minutes in the evening.

How are you working on becoming more flexible?